In my last post here, I touched a little on the need for a balance between building user interfaces in code and using IDE tools like Interface Builder. Today I would like to develop the importance of that concept a little further. People tend to become comfortable with one method or the other after they've been developing applications for any period of time, and they start to gravitate heavily that direction. This can often lead to complex code or bloated NIB files in order to accomplish a task, simply for the sake of using the developer's favorite tool.
IB vs. Code
I have cooked up a small list of advantages/disadvantages for IB and code-based UI layout:
-
Interface Builder is GREAT For
- Quick and Precise static layout of subviews in containers
- Easily applying parameters to views (styles, fonts, scroll parameters, etc.)
-
Code Layout is GREAT For
- Dynamically adding/removing/moving views around in a container
- Creating conditional view layouts based on user decisions
Building iPhone UI in a balanced fashion involves exploiting each of these strengths through some simple rules:
- Static element properties are easier to SET and to READ LATER in
Interface Builder
- Elements such as pickers, buttons, text fields, etc. will have parameters that do not change; such as (usually) font, backgrounds, and even frame size.
- Use NIB files as archives for elements that you need to lay out dynamically,
but don't want to waste the time defining in code.
- Use the ease of IB to create, size up, and define properties for each element.
- Code isn't as scary when you need only add/remove/relocate/resize
- Many people shy away from code layout when the volume of code required looks daunting.
- If IB does all the creation work, a few functions like
addSubView,removeFromSuperView, andsetFramecan get you pretty far.
Simple Example
In this example, we have a simple view controller that includes a grouped table view. This table view needs to have a UIButton inserted at the bottom of it to perform an action associated with this view. In addition, a picker view must be defined that will slide into place when the user needs to make a change in one of the cells. There are two primary issues with this layout that make it difficult to do strictly in IB:
UITableViewis laid out with help of the delegate methods at runtime. A button cannot just be dropped into the NIB at the table footer.- The
UIPickerViewis a temporary visitor to this view during editing, it cannot live permanently as part of the view outlet.
Some might say that these two issues require you to do the bulk of the work in code. You could...but maybe there's a balance that can save us some time.
With the simple rules in mind, let's start in Interface Builder:
We want to leverage IB as much as we can for doing the things it is best at.
So we lay out the main view, which is a complex view including both our
UITableView and a UIScrollView that might serve some other purpose.
Each of these is to be laid out so they fill a portion of the main screen.
Inside the NIB archive (but not the main view), we also have our picker element
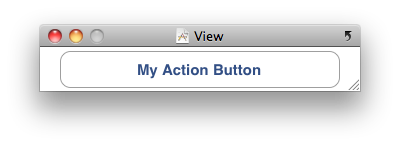
(a UIDatePicker) and our UIButton. The UIButton has been wrapped in a
UIView to make it easier to fit in the table's footer.
The button we want is only 280x37 pixels, and we wrap it in a UIView that is
320x44 pixels so it fits nicely and centered once added to the table.
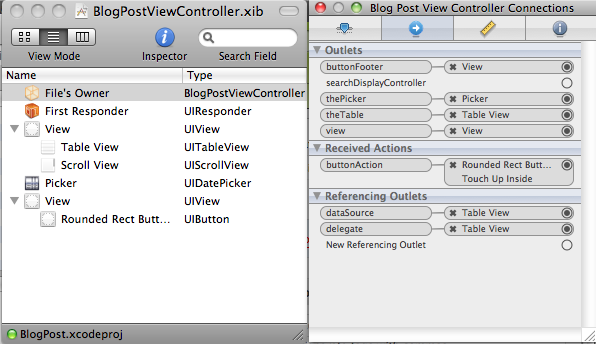
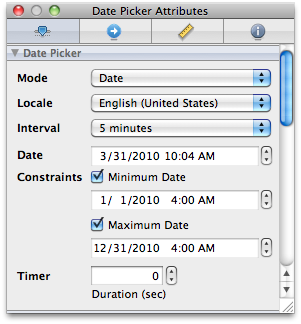
We also make the necessary property changes here to each element. The UIButton
is given text, and its frame's background cleared. The UIDatePicker is set to
report only month/day/year information, and all delegates/targets/actions are
connected as outlets.
All of these actions are very easy to do in IB, so we leverage its power to do them. This format makes the properties easier to set, and to read later when we have to figure out what the heck our past 'selves were thinking!
After building the interface elements, we can do the dynamic parts in code... and the code is extremely simple. The relevant methods are shown below:
@interface BlogPostViewController : UIViewController {
  UITableView *theTable;
  UIDatePicker *thePicker;
  UIView *buttonFooter;
}
-(IBAction)buttonAction;
@property (nonatomic,retain) IBOutlet UITableView *theTable;
@property (nonatomic,retain) IBOutlet UIDatePicker *thePicker;
@property (nonatomic,retain) IBOutlet UIView *buttonFooter;
@end
@implementation BlogPostViewController

- (void)viewDidLoad {
    //Using code to link the IB button into the table view
    [theTable setTableFooterView:buttonFooter];
}

- (IBAction)buttonAction {
    //Using code to dismiss the picker as an editor
    [thePicker removeFromSuperview];
}

- (void)tableView:(UITableView *)tableView didSelectRowAtIndexPath:(NSIndexPath *)indexPath {
    [tableView deselectRowAtIndexPath:indexPath animated:YES];
    //Using code to display the picker as an editor
    [self.view addSubview:thePicker];
    CGRect screenRect = [[UIScreen mainScreen] applicationFrame];
    CGSize pickerSize = [thePicker sizeThatFits:CGSizeZero];
    CGRect destinationRect = CGRectMake(
            0.0,
            screenRect.origin.y + screenRect.size.height - pickerSize.height,
            pickerSize.width,
            pickerSize.height);
    [thePicker setFrame:destinationRect];
}

@end
Now we only needed one line of code to attach the UIButton, which is used to
dismiss our picker, to the table footer. The removal action of the picker is also
a single line of code. The example brings up the picker when a user selects any
table cell. This code is also very simple, with the most complex part being the
calculation of the y-coordinate to use for placing the picker.
This example is not production-ready. In most cases you would add the subview
(like the picker) off-screen (make origin.y larger than the screen height),
and then animate a frame change bringing it into view. But the basics are here
to show how simple the code can be when IB handles all the setup work.
Conversely, it would have been extremely difficult to try and lay out the button
and picker to be dynamic using only IB as our UI tool.