A common request from designers that I work with is to draw text in an application that contains an inner shadow. An example of what this looks like is provided below (top un-styled, bottom with shadow added):
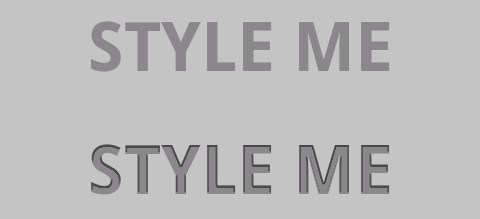
Basically we're talking about a shadow that appears inside the drawn text,
rather than slightly outside it. The Android APIs don't directly provide a simple
method of doing this; unfortunately the only effect that can be applied without
working directly with the TextView's Paint object is a drop shadow. Luckily,
this effect can be achieved with a little bit of trickery using the EmbossMaskFilter
that Android does provide. The disadvantage with this filter is it's not very well
documented as to what it's parameters really do, so let's see if we can clear that
up and create a usable inner shadow.
What is EmbossMaskFilter?
EmbossMaskFilter can be applied to any Paint object to generate an "embossed"
look to the content being drawn, whether it be text or any other shape/content that
can be drawn to a Canvas. By definition, an emboss effect is designed to make the
content look like it is slightly raised up. This is accomplished by placing highlights
on one side of the element and corresponding lowlights (shadows) on the opposite side.
While this is not entirely the look we want, it turns out the configurable parameters
of EmbossMaskFilter allow us to dial down the highlights almost completely so we
are left only with the inner shadow effect.
First, let's take a look at the options you can use to construct an EmbossMaskFilter.
The constructor signature looks like the following:
public EmbossMaskFilter (float[] direction, float ambient, float specular,
        float blurRadius)
Let's look at each parameter:
-
Direction: Where is the light source coming from?
- This is a x/y/z combo to place the light source in relation to the content.
- The x-coordinate denotes the horizontal placement
- The y-coordinate denotes the vertical placement
- The z-coordinate denotes how far above the screen the theoretical light source exists.
- For instance,
(0, 0, 0)would be smack on top in the center and no real help. At(0, 0, 1)the light would be directly above the content and cast an even shadow (think, high noon); while(1, 1, 1)would locate the light source slightly to the top and to the left of the content, while being equally as high above the screen (z-coordinate).
-
Ambient: How bright is the light?
- This is a value between 0.0 and 1.0 to show the brightness of the light source. Its net effect effect is to lighten or darken the shadow overlay, although setting the value all the way to either extreme will usually make the shadow disappear.
-
Specular: How reflective is the content?
- This value controls how reflective the material is. Specular highlights are the shiny spots that show up on reflective materials, and this value represents the coefficient used in the Phong Model of determining their size and shape. Its net effect is that higher values create narrow highlights that are visible only at direct viewing angles. We want to keep this value high for an inner shadow so that the reflective highlights are narrow enough to be basically invisible. A value larger than 15 usually does the trick.
-
Blur Radius: How sharp is the edge?
- This controls the sharpness of the edge that the created artifacts (highlights and shadows) have. It must be set to something (won't draw properly with a value of zero), but for our shadow we want to keep this low so the shadow is subtle and crisp. Increasing it can add some more dimension, but anything above 5.0 usually starts to look sloppy.
Creating the Effect
So know that we've discussed what the effect parameters mean, how can we combine them to create the shadow effect. The parameter of primary importance is the light source. We want the light source be "very close" to the drawing surface, as this will make it easier to minimize out the highlight reflection, this is accomplished by a low "Z" value for the light direction; we'll use 0.5. The other two parameters can be combined to establish where you want the shadow to occur. Most often, an inner shadow should come down from the top, so we are going to place the X/Y coordinates a 0.0 and -1.0:
float[] direction = new float[] {0.0f, -1.0f, 0.5f};
This may seem a little counterintuitive since the idea of and inner shadow at the top should correlate to the light source coming from above, but since we are really capitalizing on the back side of the emboss, this direction will be reversed. As for the secondary parameters:
- A good starting point for the ambient light is around 0.6
- Specularity should be >15.0 to eliminate the highlights usually found in an emboss effect. You probably won't see much difference between 15 and 50 unless you adjust the light source angle to be higher.
- Blur radius should usually be a a value between 0.5 and 5.0. We'll use 1.0 for this example.
So a good starting filter for an inner shadow effect would look like:
MaskFilter filter = new EmbossMaskFilter(direction, 0.8f, 15f, 1f);
Adding to TextView
Using this filter on TextView is quite simple, and you can do so in one of two ways...
Subclass TextView
If you plan to use this style a lot throughout an application, I would recommend a simple subclass of TextView to encapsulate the functionality. Something like this would do the trick:
public class ShadowTextView extends StyledTextView {

    public ShadowTextView(Context context) {
        super(context);
        init();
    }

    public ShadowTextView(Context context, AttributeSet attrs) {
        super(context, attrs);
        init();
    }

    public ShadowTextView(Context context, AttributeSet attrs, int defStyle) {
        super(context, attrs, defStyle);
        init();
    }

    private void init() {
        float[] direction = new float[]{0f, -1.0f, 0.5f};
        MaskFilter filter = new EmbossMaskFilter(direction, 0.8f, 15f, 1f);
        getPaint().setMaskFilter(filter);
    }
}
The filter is created with the view and attached to its Paint object so it will be used for all future text drawings.
Modify an Existing Paint
Because TextView provides a public method to access its Paint object,
you can also apply the filter directly without a subclass like so:
TextView tv;
MaskFilter filter =
    new EmbossMaskFilter(new float[]{0f, -1.0f, 0.5f}, 0.8f, 15f, 1f);
tv.getPaint().setMaskFilter(filter);
Depending on when you do this in the layout/drawing cycle of your application,
you may want to also call invalidate() on that view to ensure it redraws with
your new filter.
Keep Tweaking
Applying this filter is not quite an exact science. Especially since we are using this filter in a way slightly other than it was originally intended. Spend some time tweaking the secondary parameters of the filter and see how they affect your application results!
The following link includes a test application you can run on your device to play with the different parameter settings and see how they affect the TextView output: TextMaskFilter.apk