
Note: This article is Part 3 in our series. Here are links to Part 1 and Part 2 as well.
In the previous post, we discussed adding proper support for data set changes and targeted scrolling. In this installment of the series, we will focus on properly supporting animations in your fancy new LayoutManager.
Note: In case you've forgotten, the code samples are on GitHub.
The Problem With Free
We talked about notifyDataSetChanged() the last time, but you may have noticed
that changing the data in this way doesn’t animate the change1.
RecyclerView includes a new API for making animated changes, which requires you
to notify the adapter which positions in the adapter have changed, and what
the action was:
notifyItemInserted()andnotifyItemRangeInserted(): Insertion of new item(s) at the given position(s).notifyItemChanged()andnotifyItemRangeChanged(): Invalidate the item(s) at the given position(s), nothing structural has changed in the data set.notifyItemRemoved()andnotifyItemRangeRemoved(): Removal of the item(s) at the given position(s).notifyItemMoved(): An item has relocated to a new position in the data set.
By default, your LayoutManager will get "simple item animations" for free when these methods are used. These animations are simply based on whether each current view position is still present in the layout after a change. New views are faded in, removed views are faded out, and other views are moved to their new location. Here’s what our grid layout looks like with the free animations:
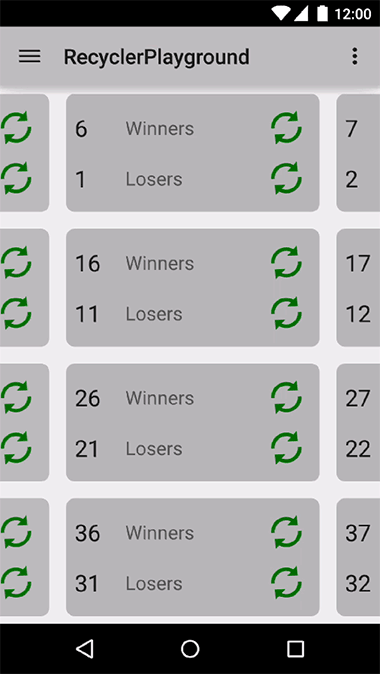 Figure: Default Simple Item Animations
The problem here is that several items fade out that weren’t removed. This is because they are no longer visible inside the parent RecyclerView bounds. We would like the views to slide out of view towards where the user would expect them to go, but at this stage the framework only knows that our code didn’t lay them out again after the data set change took place. In addition, new views are fading in as if they were added. It would be better if these views slid into place from their expected locations as well.
The framework needs our help–we have to add a bit more to the LayoutManager...
Predictive Item Animations
The following animation represents what conceptually ought to happen when an item is removed:
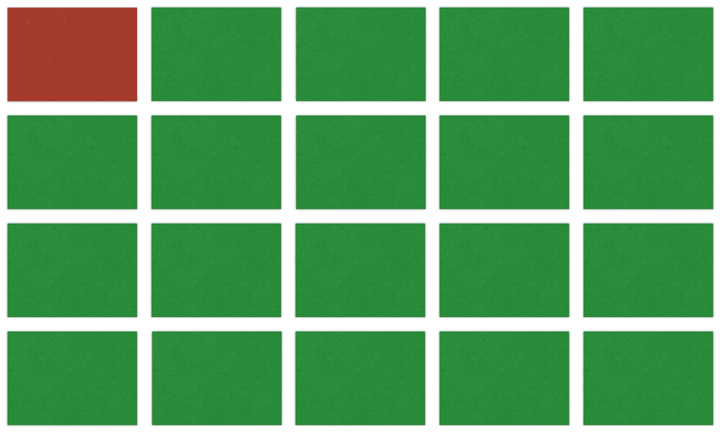 Figure: Removal Animation Concept
Notice particularly how the items on the left have to slide up and to the right to fill the gap on the previous row. You can imagine the reverse happening for an item added in this location.
As we discussed in the first post of the series, onLayoutChildren() is typically
only called once by the parent RecyclerView during the initial layout or when
the data set size (i.e. item count) changes. The predictive item animations feature
allows us to provide a more meaningful description of how the views should transition
based on changes in the data. We need to start by indicating to the framework that
our LayoutManager is able to provide this additional data:
@Override
public boolean supportsPredictiveItemAnimations() {
    return true;
}
With this one change, onLayoutChildren() will now be called twice for each
batch of data set changes–first as a “pre-layout” phase, and again for the real
layout.
What Should I Do During Pre-Layout?
During the pre-layout phase of onLayoutChildren(), you should run your layout
logic to set up the initial conditions for the change animation. This means that
you need to lay out all the views that were currently visible before the change
AND any additional views that you know will be visible after the animation runs
(these are termed APPEARING views). These extra appearing views should be laid
out in the off-screen positions where the user would expect them to be coming from.
The framework will capture these positions and use them to animate the new views
into place instead of doing a simple fade-in.
Tip: We can check which layout phase we are in via
RecyclerView.State.isPreLayout()
In the FixedGridLayoutManager example, we use pre-layout to determine how many
visible views are being removed as a result of the data set change. Removed views
are still returned from the Recycler in pre-layout, so you can lay them out in
their original location and not have to worry about accounting for an empty space.
To indicate future removal to you, LayoutParams.isViewRemoved() will return true
for the given view. Our example counts the number of removed views so we have a
rough idea of how much space will get filled by appearing views.
@Override
public void onLayoutChildren(RecyclerView.Recycler recycler,
                             RecyclerView.State state) {
    // ...

    SparseIntArray removedCache = null;
    /*
     * During pre-layout, we need to take note of any views that are
     * being removed in order to handle predictive animations
     */
    if (state.isPreLayout()) {
        removedCache = new SparseIntArray(getChildCount());
        for (int i=0; i < getChildCount(); i++) {
            final View view = getChildAt(i);
            LayoutParams lp = (LayoutParams) view.getLayoutParams();

            if (lp.isItemRemoved()) {
                //Track these view removals as visible
                removedCache.put(lp.getViewPosition(), REMOVE_VISIBLE);
            }
        }
        // ...
    }

    // ...

    //Fill the grid for the initial layout of views
    fillGrid(DIRECTION_NONE, childLeft, childTop,
             recycler, state.isPreLayout(), removedCache);

    // ...
}
Tip: During pre-layout, RecyclerView attempts to map the adapter positions of your views to their “old” locations (meaning before the data set change). When you ask for a view by position, expect that position to be the initial position of that item view. Beware of trying to transform them yourself between pre-layout and “real” layout.
The final change in the example comes as a modification to fillGrid() in which
we will attempt to lay out “N” additional views (per row) as appearing views,
where N is the number of visible views being removed. These views will always be
filled in from the right on a removal, so they are computed as the positions
following the last visible column:
private void fillGrid(int direction,
                      int emptyLeft,
                      int emptyTop,
                      RecyclerView.Recycler recycler,
                      boolean preLayout,
                      SparseIntArray removedPositions) {
    // ...

    for (int i = 0; i < getVisibleChildCount(); i++) {
        int nextPosition = positionOfIndex(i);

        // ...

        if (i % mVisibleColumnCount == (mVisibleColumnCount - 1)) {
            leftOffset = startLeftOffset;
            topOffset += mDecoratedChildHeight;

            //During pre-layout, on each column end, apply extra appearing views
            if (preLayout) {
                layoutAppearingViews(recycler, view, nextPosition,
                        removedPositions.size(), ...);
            }
        } else {
            leftOffset += mDecoratedChildWidth;
        }
    }

    // ...
}

private void layoutAppearingViews(RecyclerView.Recycler recycler,
                                  View referenceView,
                                  int referencePosition,
                                  int extraCount,
                                  int offset) {
    //Nothing to do...
    if (extraCount < 1) return;

    for (int extra = 1; extra <= extraCount; extra++) {
        //Grab the next position after the reference
        final int extraPosition = referencePosition + extra;
        if (extraPosition < 0 || extraPosition >= getItemCount()) {
            //Can't do anything with this
            continue;
        }

        /*
         * Obtain additional position views that we expect to appear
         * as part of the animation.
         */
        View appearing = recycler.getViewForPosition(extraPosition);
        addView(appearing);

        //Find layout delta from reference position
        final int newRow = getGlobalRowOfPosition(extraPosition + offset);
        final int rowDelta =
                newRow - getGlobalRowOfPosition(referencePosition + offset);
        final int newCol = getGlobalColumnOfPosition(extraPosition + offset);
        final int colDelta =
                newCol - getGlobalColumnOfPosition(referencePosition + offset);

        layoutTempChildView(appearing, rowDelta, colDelta, referenceView);
    }
}
Inside the layoutAppearingViews() helper, each additional appearing view is
laid out at it’s “global” position (i.e. the row/column position it would occupy
in the grid). This location is off-screen, but gives the framework the data it
needs to produce a starting point for the animation to slide these views in.
Changes for the “Real” Layout
We’ve already discussed the basics of what to do during your layout in Part 1, but we’ll have to tweak the formula a bit with our animation support added. The one additional step will be to determine if we have any disappearing views. In our example, this is done by running a normal layout pass, and then determining if there are any views left in the Recycler’s scrap heap.
Note: We can use the scrap heap in this way because our layout logic always calls
detachAndScrapAttachedViews()before starting each layout pass. As discussed previously, this is the best practice to adhere to in your layouts.
Views still in scrap that aren’t considered removed are disappearing views. We need to lay these views out in their off-screen positions so the animation system can slide them out of view (instead of just fading them out).
@Override
public void onLayoutChildren(RecyclerView.Recycler recycler,
                             RecyclerView.State state) {
    // ...

    if (!state.isPreLayout() && !recycler.getScrapList().isEmpty()) {
        final List<RecyclerView.ViewHolder> scrapList = recycler.getScrapList();
        final HashSet<View> disappearingViews = new HashSet<View>(scrapList.size());

        for (RecyclerView.ViewHolder holder : scrapList) {
            final View child = holder.itemView;
            final LayoutParams lp = (LayoutParams) child.getLayoutParams();
            if (!lp.isItemRemoved()) {
                disappearingViews.add(child);
            }
        }

        for (View child : disappearingViews) {
            layoutDisappearingView(child);
        }
    }
}

private void layoutDisappearingView(View disappearingChild) {
    /*
     * LayoutManager has a special method for attaching views that
     * will only be around long enough to animate.
     */
    addDisappearingView(disappearingChild);

    //Adjust each disappearing view to its proper place
    final LayoutParams lp = (LayoutParams) disappearingChild.getLayoutParams();

    final int newRow = getGlobalRowOfPosition(lp.getViewPosition());
    final int rowDelta = newRow - lp.row;
    final int newCol = getGlobalColumnOfPosition(lp.getViewPosition());
    final int colDelta = newCol - lp.column;

    layoutTempChildView(disappearingChild, rowDelta, colDelta, disappearingChild);
}
Warning: Laying out views (and, thus, adding them to the container) removes them from the scrap list. Be careful to note the views you need from scrap before you start making changes, or you will end up with concurrent modification issues on the collection.
Similar to our code for the appearing views, layoutDisappearingView() places
each remaining view at it’s "global" position as the final layout location.
This gives the framework the information that it needs to slide these views out
in the proper direction during the animation.
The following image should help to visualize the FixedGridLayoutManager example:
- The black box represents the
RecyclerViewvisible bounds. - Red View: Item removed from the data set.
- Green Views (Appearing views): Not initially present, but laid out off-screen during pre-layout.
- Purple Views (Disappearing views): Initially placed in their original locations during pre-layout, then laid out off-screen during the “real” layout phase.
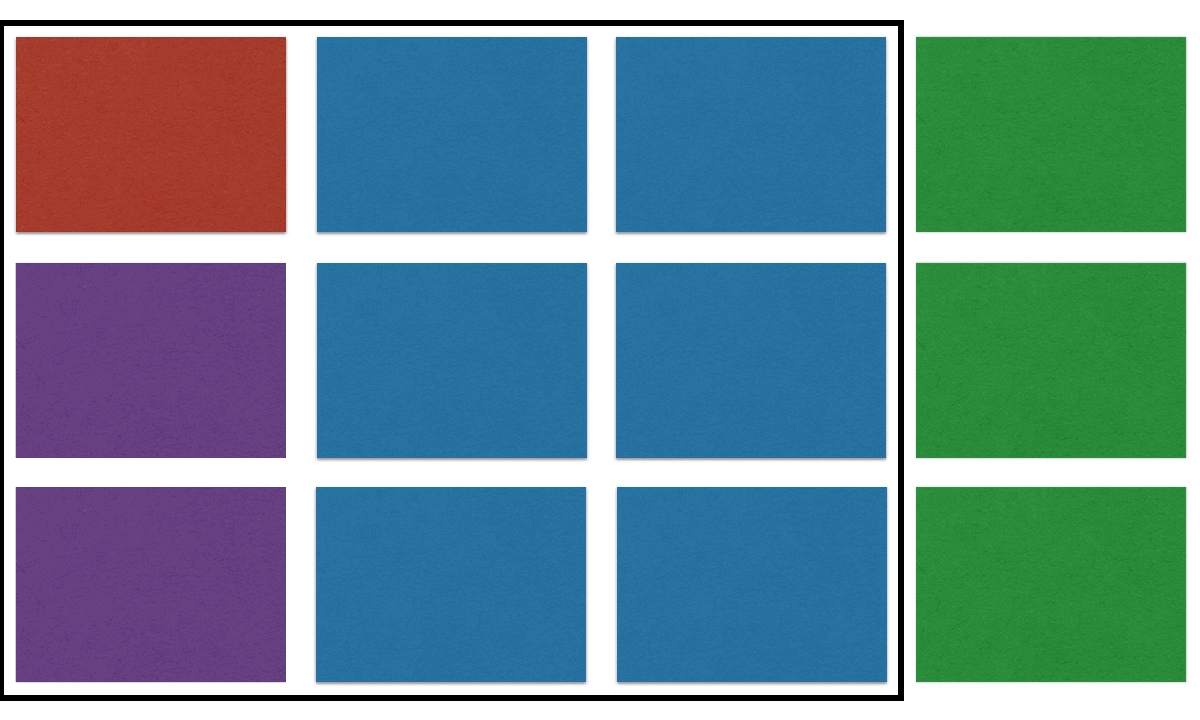 Figure: Simple Remove Animation
Reacting to Off-Screen Changes
You may have noticed that our ability to determine a removal change in the last section hinged on the visible views. What if the change occurs outside the visible bounds? Depending on your layout structure, a change like this may still require you to adjust the layout for a better animation experience.
Luckily, the adapter posts these changes to your LayoutManager as well.
You can override onItemsRemoved(), onItemsMoved(), onItemsAdded(), or
onItemsChanged() to react to these events even if they occur in a view range
that isn’t reflected in the current layout. These methods will give you the position
and range of the change.
When the removed range occurs outside the visible area, onItemRemoved() is
called before pre-layout. This allows us to collect data about the change that
we may need in order to best support any appearing view changes that might be
caused by this event.
In our example, we collect these removals in the same way as before, but mark them with a different type.
@Override
public void onItemsRemoved(RecyclerView recyclerView,
                           int positionStart,
                           int itemCount) {
    mFirstChangedPosition = positionStart;
    mChangedPositionCount = itemCount;
}

@Override
public void onLayoutChildren(RecyclerView.Recycler recycler,
                             RecyclerView.State state) {
    // ...

    SparseIntArray removedCache = null;
    /*
     * During pre-layout, we need to take note of any views that are
     * being removed in order to handle predictive animations
     */
    if (state.isPreLayout()) {
        // ...

        //Track view removals that happened out of bounds (i.e. off-screen)
        if (removedCache.size() == 0 && mChangedPositionCount > 0) {
            for (int i = mFirstChangedPosition;
                    i < (mFirstChangedPosition + mChangedPositionCount); i++) {
                removedCache.put(i, REMOVE_INVISIBLE);
            }
        }
    }

    // ...

    //Fill the grid for the initial layout of views
    fillGrid(DIRECTION_NONE, childLeft, childTop,
             recycler, state.isPreLayout(), removedCache);

    // ...
}
Tip: This method is sill called when the removed items are visible. In that case, however, it is called after pre-layout. This is why our example still gathers data from the visible removed views when they are present.
With all this in place, we can run the sample application again. We can see the disappearing items on the left sliding off to rejoin the end of their previous rows. The new appearing items on the right slide properly into place alongside the existing grid. Now, the only view fading out in our new animation is the view that was actually removed!
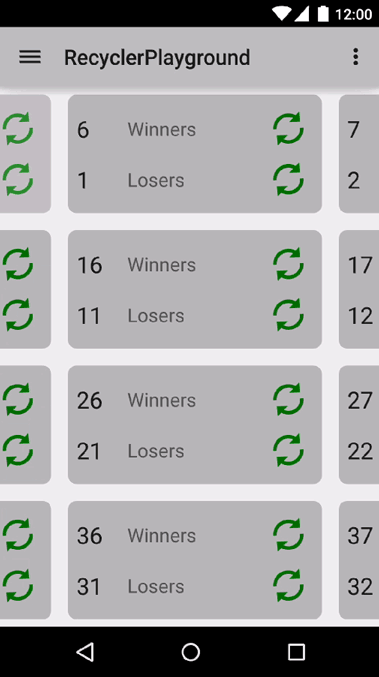 Figure: Predictive Removal Animation
More To Come...
This was supposed to be the end of this series, I swear!
However, there were some interesting issues that came up in building the animations
that are specific to the FixedGridLayoutManager use case, and not necessarily
all custom implementations. So in the next (and final...I promise this time) post,
I’ll address what those challenges were.
A special thanks to Yiğit Boyar for providing much of the technical input that made this post possible!
-
The framework will attempt to animate views if your adapter uses stable IDs, which provides enough data to guess which views are removed/added/etc. ↩︎