Google recently released the Proximity Beacon API to enable applications to better manage beacon deployments in the field, regardless of the beacon technology they are using. The Beacon API connects deployments using Apple iBeacon, Radius Networks' AltBeacon, and Google Eddystone to a common data store that applications can reference from iOS, Android, and the web. In this article we will explore how to get set up with the Proximity Beacon API, as well as the benefits for using it in your deployments.
Note: You can reference the entire Proximity Beacon Manager sample on GitHub.
The Proximity Beacon API is a set of RESTful endpoints that you can interact with from any platform. There are currently no official client libraries available (although there is a small wrapper nested in Google's Android beacon sample that may help simplify the interactions).
To provide context to the discussion, we will walk through some of the basics involved in creating a manager application for Android to interact with the Proximity Beacon API.
Enabling the API
The Proximity Beacon API is part of the Google Developers Console. You will need to create a new project using a Google account to get started.
Once you have a project created, you need to enable the Proximity Beacon API. This can be done one of two ways. The simplest way is to use this link to enable the API in an existing project (or even create a new one at the same time) if you are already logged in. You can also enable the API manually:
- Open https://console.developers.google.com/
- Select your project from the dropdown list
- Select APIs & auth > APIs
- Search for Google Proximity Beacon API and select it
- Click the Enable API button at the top
If you go back, Google Proximity Beacon API should now show up under the Enabled APIs tab.
API Credentials
These credentials will not be used in the code, but they are required to bind our manager application's package+signature to the Beacon API project. In order to manage your beacons, you will need an OAuth 2.0 client ID for each platform where you intend to access the API:
-
In the console, select APIs & auth > Credentials.
-
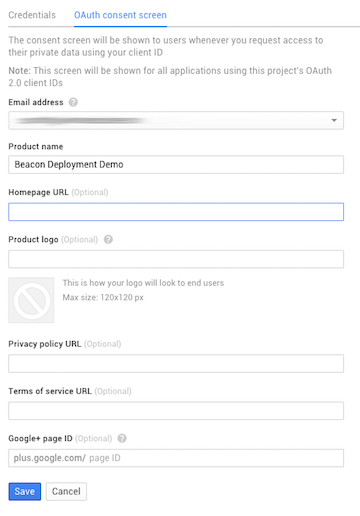
First, we need to provide a Product name for the OAuth consent screen. Select the OAuth consent screen tab, fill in that value, and Save.
-
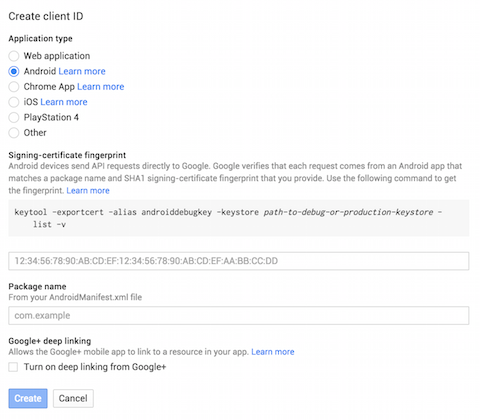
Select the Credentials tab > Add credentials > OAuth 2.0 client ID. Choose the client that suits your application. In our example, we will be managing the beacons from an Android device, so I chose Android for the Application type. In this case, we need to also supply the SHA-1 of the key used to sign the APK and the application's package name. For other platforms, follow the prompts specific to that type and click Create.
API Key credentials do not work for beacon management features, you must have an OAuth client ID. These credentials will only be valid for the Google accounts that are editing members of your console project—meaning you must log in with one of the Google accounts listed as an owner or editor in the Permissions section of your console project. Other accounts will not have access to the beacon API methds and will be rejected.
Propagation of these credentials can take a bit of time. After creating your client ID, you may need to wait up to an hour before they will allow clients to access the API. This is especially true for iOS/Android clients.
Authenticating the Client
All requests made of the Proximity Beacon API must be authenticated using an
OAuth token generated using the client ID created in the previous step.
The simplest method of obtaining an OAuth token from an Android client is to use
the GoogleAuthUtil from Google Play Services.
Google Play Services must be added to our project as a dependency:
dependencies {
    // ...
    compile 'com.google.android.gms:play-services:7.8.0'
}
In order to authenticate, the user must first select the Google account they wish
to use, which we can gather from the AccountPicker:
import com.google.android.gms.common.AccountPicker;
// ...

private void pickUserAccount() {
    String[] accountTypes = new String[]{"com.google"};
    Intent intent = AccountPicker.newChooseAccountIntent(null, null,
            accountTypes, true, null, null, null, null);
    startActivityForResult(intent, REQUEST_PICK_ACCOUNT);
}
Remember that you (the user) must choose an account that has sufficient access
rights in your console project, or none of the API calls will succeed!
This will return back the name (i.e. email address) of the selected account that
you can forward to the GoogleAuthUtil to obtain an OAuth client token.
This request must include a list of OAuth scopes you want the token to access.
The OAuth scope for the beacon API is
https://www.googleapis.com/auth/userlocation.beacon.registry:
private static final String SCOPE_PROXIMITY =
        "oauth2:https://www.googleapis.com/auth/userlocation.beacon.registry";

private String fetchToken(String email) throws IOException {
    try {
        //Attempt to get an OAuth token from Play Services
        return GoogleAuthUtil.getToken(this, email, SCOPE_PROXIMITY);
    } catch (UserRecoverableAuthException e) {
        // User hasn't granted permission yet. Show the permission dialog.
        Intent intent = ((UserRecoverableAuthException) e).getIntent();
        startActivityForResult(intent, REQUEST_ERROR_RECOVER);
    } catch (GoogleAuthException e) {
        Log.w(TAG, "Fatal Exception", e);
    }

    return null;
}
Note:
getToken()is blocking, and should be called in a background thread.
The first time you attempt this, it will fail with a UserRecoverableAuthException,
because the user hasn't granted your application permission to use their account credentials.
The exception provides you with another intent to send the user to a permission screen:
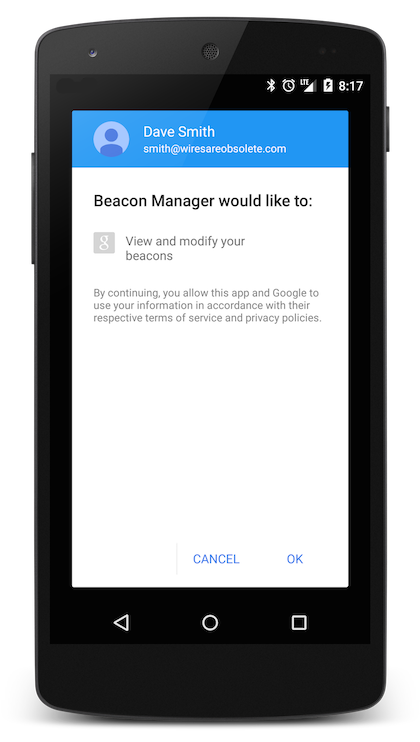
If the user grants access from this dialog, you can safely call getToken()
again and it will succeed.
You can see the entire authentication flow from the example application in AuthenticationActivity.
Authenticated Requests
The token you receive must be passed as an Authorization header with each subsequent request to the API. The exact code for doing this depends on your HTTP library of choice, but the following shows how we are doing it in the sample application using Volley:
public class AuthenticatedRequest extends JsonObjectRequest {

  private String mAuthToken;

  public AuthenticatedRequest(int method, String url,
                              JSONObject requestBody,
                              Response.Listener listener,
                              Response.ErrorListener errorListener) {
      super(method, url, requestBody, listener, errorListener);
  }

  public void setAuthToken(String token) {
      mAuthToken = token;
  }

  public Map getHeaders() throws AuthFailureError {
      HashMap headers = new HashMap<>();
      headers.put("Content-Type", "application/json");
      headers.put("Authorization", "Bearer " + mAuthToken);

      return headers;
  }
}
Managing Beacons
The beacon API supports four top-level actions for a beacon object:
- Register - Add a new beacon identifier to the API
- Decommission - Take a beacon identifier permanently out of service
- Activate - Make a beacon identifier visible to observers
- Deactivate - Hide a beacon identifier from observers
The beacon database is global, and a given beacon identifier may only be registered once across the entire API (not just your project). If you purchase beacons advertising the default values from the manufacturer, chances are they have already been registered. You will need to change your beacon identifiers to a custom value for your application before attempting to register them.
A beacon can only be registered with the API once, and decommissioned once. A decommissioned beacon identifier cannot be registered again. To take a beacon temporarily out of service, the deactivate action should be used.
The minimum required data for registering a new beacon is the AdvertisedId
—which is simply the beacon type (Eddystone, iBeacon, AltBeacon) and the unique identifier broadcast by that beacon—
and the initial status (active or inactive). You can see additional fields one
can= supply to the beacon registration in the
API reference:
{
  "advertisedId": {
    "type": "EDDYSTONE",
    "id": "RCVg2jS9IEqe1wAAAAAwOQ=="
  },
  "status": "ACTIVE"
}
The beacon's unique identifier is always transmitted as the Base64 encoded version
of the raw advertised bytes. After creation, the beacon will be returned with a
beaconName representing a path to that unique resource:
{
  "beaconName": "beacons/3!442560da34bd204a9ed7000000003039",
  "advertisedId": {
    "type": "EDDYSTONE",
    "id": "RCVg2jS9IEqe1wAAAAAwOQ=="
  },
  "status": "ACTIVE"
}
The beaconName (such as beacons/3!442560da34bd204a9ed7000000003039 from above)
will always consist of:
- "beacons/" prefix
- Beacon type:
- 1 = iBeacon
- 3 = Eddystone
- 5 = AltBeacon
- Bang (!) character
- Beacon's advertised id as a hex string
Scanning for New Beacons
Using Android as the management platform, we can couple in Bluetooth Low Energy (LE) scanning for active beacon devices that need to be registered. For each observed beacon, the manager application can make a beacons.get request to determine its API status. The API will respond with one of the following:
- 200 (OK) - Beacon is already registered to your Google console project, and the beacon details are returned in the response.
- 403 (Forbidden) - Beacon is already registered to a different Google project that you are not authorized to view.
- 404 (Not Found) - Beacon is not yet registered with the API.
Observed beacons for which the API currently returns a 404 are safe to register with your console project. You can accomplish this by posting the beacon object data (as JSON) in a beacons.register request.
/* BluetoothLeScanner ScanCallback */

@Override
public void onScanResult(int callbackType, ScanResult result) {
  processResult(result);
}

@Override
public void onBatchScanResults(List results) {
  for (ScanResult result : results) {
    processResult(result);
  }
}

@Override
public void onScanFailed(int errorCode) {
  Log.w(TAG, "LE Scan Failed: " + errorCode);
}

/* Handle discovery of any advertising beacons in range */
private void processResult(ScanResult result) {
  ScanRecord record = result.getScanRecord();
  if (record == null || record.getServiceData(UID_SERVICE) == null) {
    Log.w(TAG, "Invalid Eddystone scan result.");
    return;
  }

  Beacon.AdvertisedId advertisedId =
      Beacon.AdvertisedId.fromAdvertisement(record.getServiceData(UID_SERVICE));
  final Beacon discovered =
      new Beacon(advertisedId, Beacon.Status.STATUS_UNSPECIFIED);
  runOnUiThread(new Runnable() {
    @Override
    public void run() {
      ProximityApi.getBeacon(discovered.name, callback, callback);
    }
  });
}

/* API Response Callback */

@Override
public void onResponse(JSONObject response) {
  //Called for 2xx responses…we already own this beacon
  Beacon beacon = new Beacon(response);
  notifyResult(beacon);
}

@Override
public void onErrorResponse(VolleyError error) {
  //Called for 4xx responses
  switch (error.networkResponse.statusCode) {
    case 403:
      //We don't own this beacon…sorry
      notifyResult(new Beacon(mAdvertisedId, Beacon.Status.UNAUTHORIZED));
      break;
    case 404:
      //Nobody owns this beacon yet, it can be safely registered…
      notifyResult(new Beacon(mAdvertisedId, Beacon.Status.UNREGISTERED));
      break;
    default:
      Log.w(TAG, "Unknown error response from Proximity API", error);
  }
}
Note: You can see the entire registration flow from the example application in BeaconRegisterActivity.
Once we have one or more beacons registered to us, we can list them with beacons.list, and potentially display that list to the user.
Attachment Data
One of the primary constraints with Bluetooth LE is the payload size. Beacon devices send their payload in the advertisement packet, which carries a maximum 31 bytes of data. This provides little headroom to declare much beyond a unique identifier in the advertisement, and places extra burden on the client application to match the discovery of beacons with additional data about the physical site to make the beacon useful.
This is where attachments come in. Attachments allow an additional 1KB of raw textual data to associate with a beacon's advertised unique identifier. The data can be anything that suits your application needs, from a JSON blob to a simple string. For example, if we wanted to attach the following JSON to represent an in-store offer:
{
    "section": "Athletic Wear",
    "latest_offer": "Running shorts, buy one get one free!"
}
That could be encoded into an attachment as the following:
{
  "namespacedType": "beacon-deployment-demo/offer",
  "data": "eyJzZWN0aW9uIjoiQXRobGV0aWMgV2VhciIsImxhdGVzdF9vZmZlciI6IlJ1bm5pbmcgc2hvcnRzLCBidXkgb25lIGdldCBvbmUgZnJlZSEifQ=="
}
Attachment data is always transmitted Base64-encoded to and from the API.
Attachments also include a namespacedType value, which clients can use to
differentiate the messages they receive from a particular beacon (more on this later).
These type values must be namespaced using the console project name,
taking the form {project-name}/{type}.
You can create new attachments and associate them with an existing beacon using beacons.attachments.create. Similar to beacon creation, each attachment has a unique name that is assigned by the API. This value should be blank when creating a new attachment.
After creation, the attachment will be given a name that represents the path to that specific resource:
{
  "attachmentName": "beacons/3!442560da34bd204a9ed7000000003039/attachments/5a58d6d1-d9b5-4de6-a01d-dc73dff18779",
  "namespacedType": "beacon-deployment-demo/offer",
  "data": "eyJzZWN0aW9uIjoiQXRobGV0aWMgV2VhciIsImxhdGVzdF9vZmZlciI6IlJ1bm5pbmcgc2hvcnRzLCBidXkgb25lIGdldCBvbmUgZnJlZSEifQ=="
}
Retrieve the attachments for a beacon with
beacons.attachments.list
—which also supports appending the namespacedType query parameter to return a
subset of attachments assigned to just that type grouping.
Pros and Cons
Admittedly, this is a lot of setup work to go through to get started observing Google beacons. At first glance, the Proximity Beacon API might seem like unnecessary overhead. While there is setup work involved in gaining access to the API, Google is providing you back-end features you would have likely spent time building yourself anyway for a sufficiently large beacon deployment.
Attachments alone represent a feature almost every beacon deployment needs—the ability to bind additional data to the 31 byte advertisement to make it more contextual for the client application. With the Proximity Beacon API, beacons can be managed such that their role is separate from the hardware advertisements. With a small amount of front-end development, a management console can be created to easily swap out beacons in the field without changing the client-side software's understanding of the data it observes.
On the client side, part of this is leveraging the Nearby Messages API to discover data associated with beacons. In Part 2 of this series, we will look at the client side of the system, and how beacon messages are processed on the user's mobile device.