Note:
ConstraintLayoutand the layout editor tools are currently in preview. The information in this post is based on the code and behavior ofconstraint-layout:1.0.0-alpha4. These behaviors may change as the tools approach final release.
In the last post, we spent some time exploring the various constraints that are
available for use with ConstraintLayout. Now let's dive deeper into the mechanics
of this flexible new tool, starting with how the code is organized internally.
Where Do You Put It All?
As with any ViewGroup, each child view is attached to a LayoutParams instance
when it is added to the ConstraintLayout container. From within XML layouts,
all attributes prefixed with layout_ are added to the LayoutParams instance
for that view. Recall from the last article that all constraints are defined with
this same prefix, thus you will find them stored in LayoutParams.
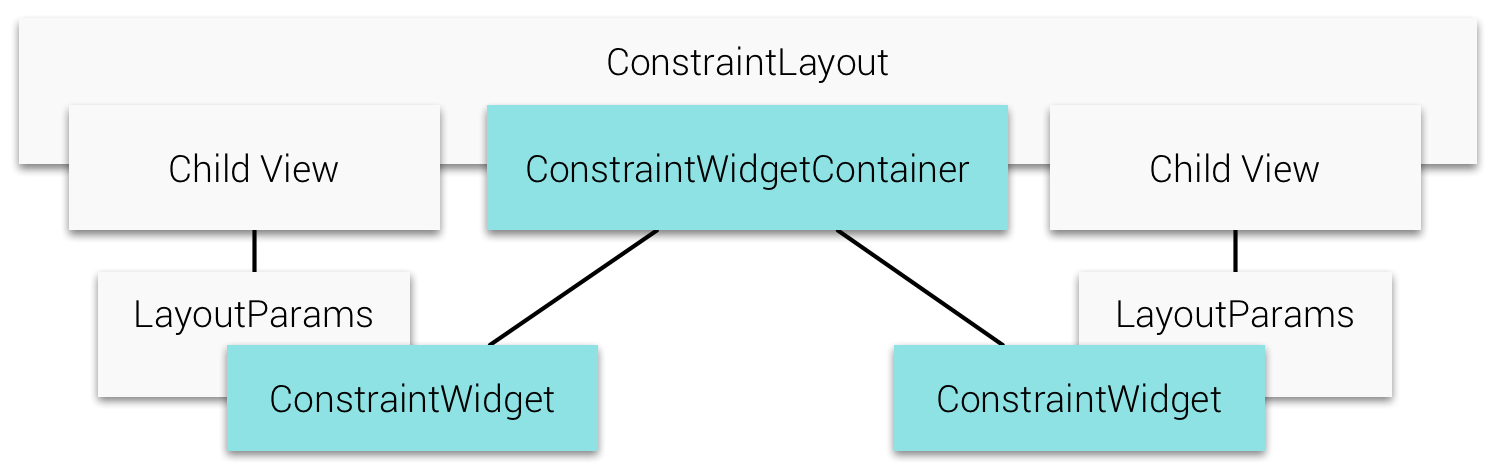
Each LayoutParams instance contains another component called the ConstraintWidget,
which contains the logic to process and analyze the constraints.
Each ConstraintWidget is connected back to a parent ConstraintWidgetContainer,
forming a relationship similar to that between a parent ViewGroup and the child
views.
The ConstraintWidget holds all the relevant information about the view's position
and size as it is computed from the constraints. It becomes the source of truth
for measurement and layout data when needed by the framework rather than the
LayoutParams.
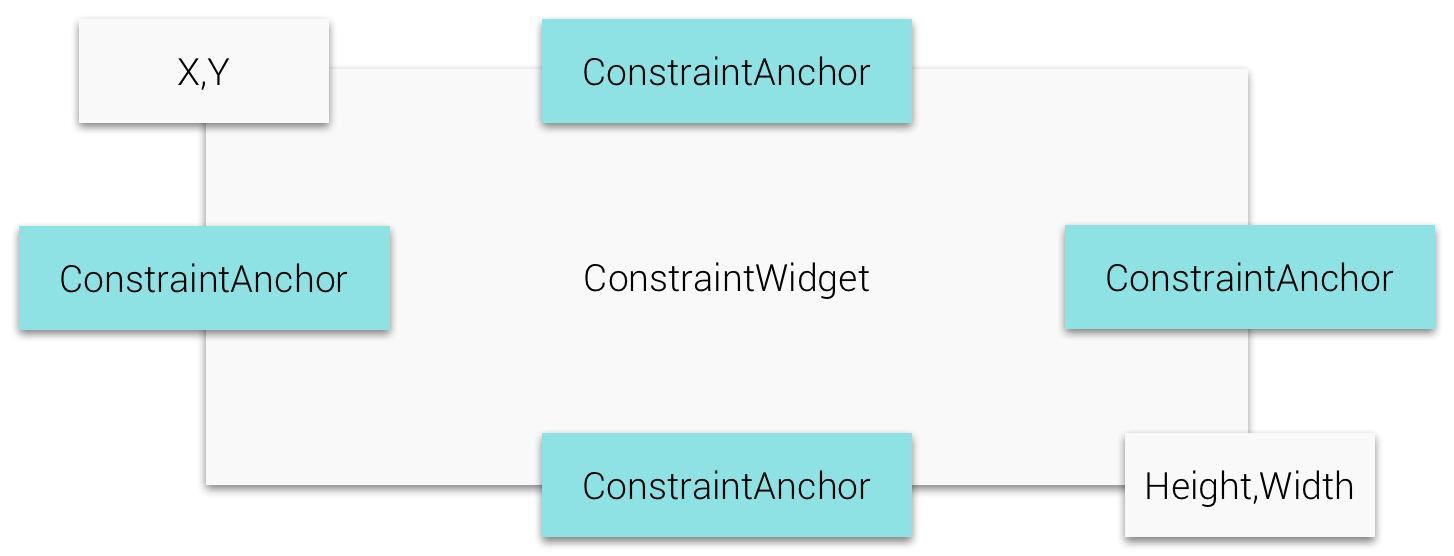
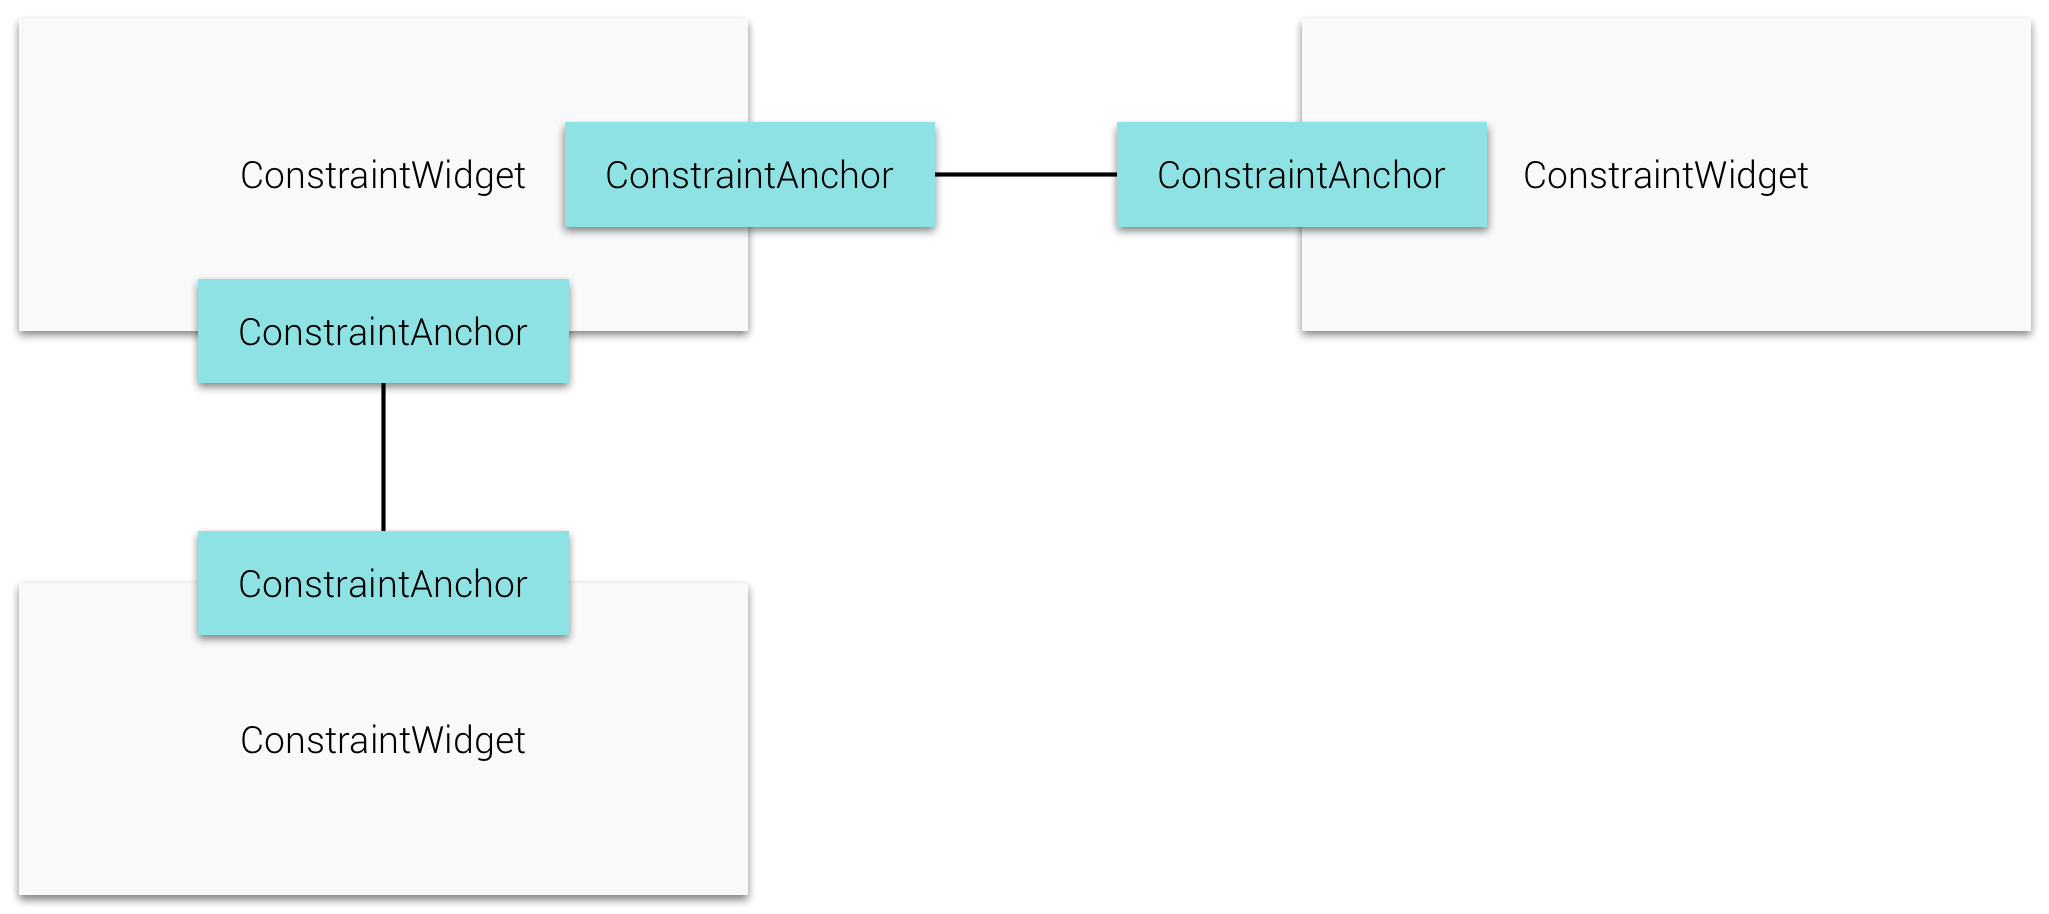
During layout, each ConstraintWidget is filled with the constraint information
from LayoutParams. The widget defines a ConstraintAnchor for each "connectable"
point (left, right, top, bottom, baseline, center), and these anchors are attached
together to form a simple graph of the constraints applied to each view.
Measurement Process
If you want to better understand any ViewGroup, a great place to start is analyzing
the onMeasure() and onLayout() methods within it. For the uninitiated, these
are the methods on any view
that describe the size and position of that view and its children (in the case of
ViewGroup).
A quick tour through the onMeasure() of ConstraintLayout reveals the following
high-level process:
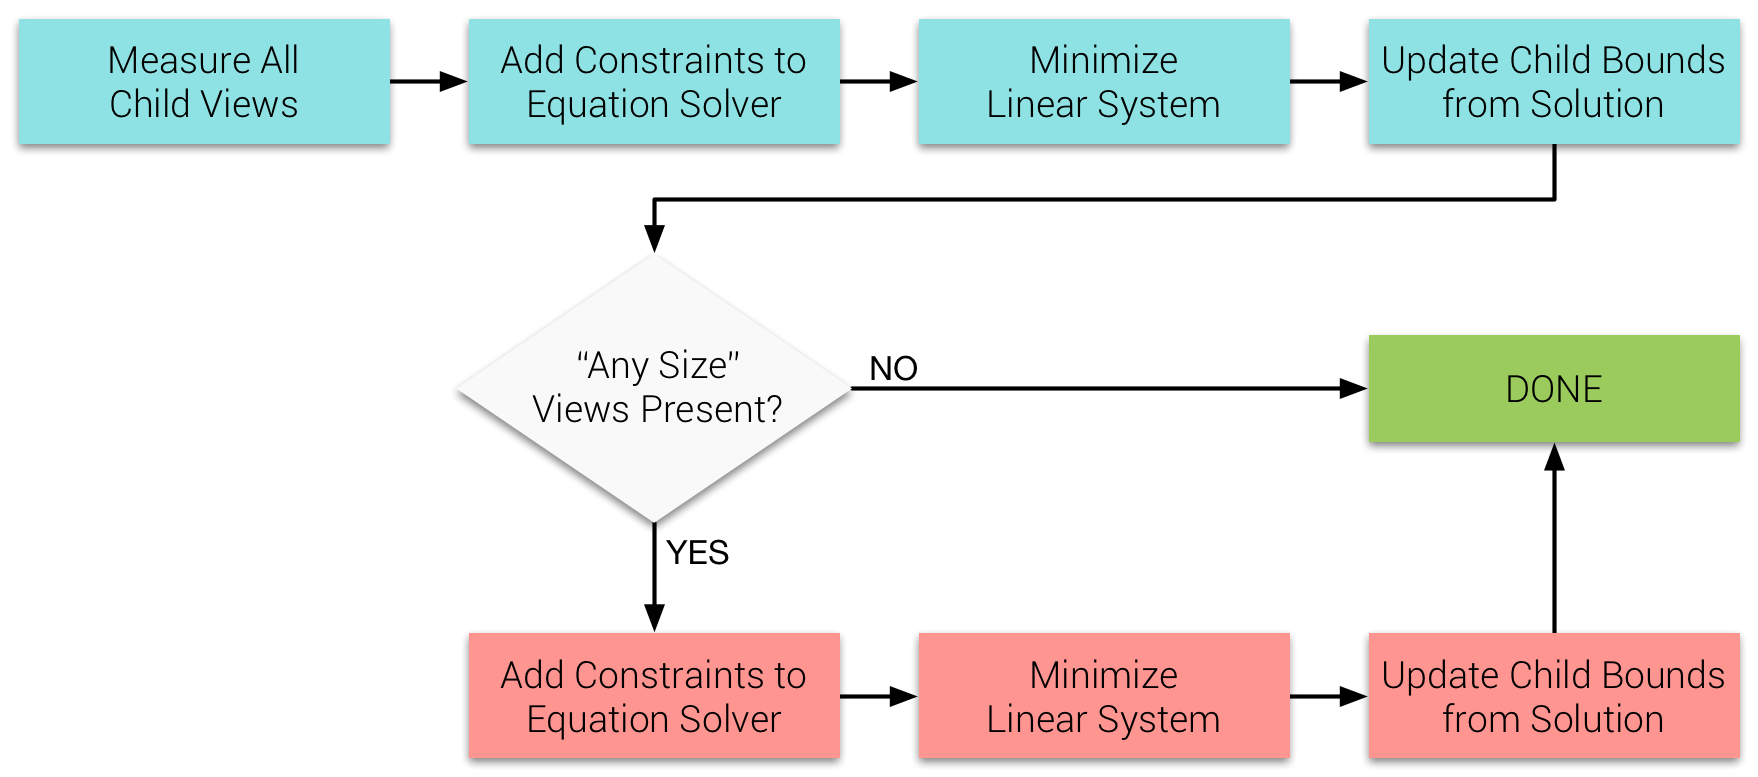
Tip: Having any size views in the container automatically adds a second pass through the measure process (or most of it, anyway).
From the last post, you may remember that views
inside a ConstraintLayout have unique measurement characteristics — match_parent
doesn't work and we can set a dimension to 0dp to cause it to be any size.
Have a look at the following snippet from ConstraintLayout measurement:
// ...

int childWidthMeasureSpec;
if(width == 0) {
  childWidthMeasureSpec = getChildMeasureSpec(parentWidthSpec, widthPadding, WRAP_CONTENT);
} else {
  childWidthMeasureSpec = getChildMeasureSpec(parentWidthSpec, widthPadding, width);
}

int childHeightMeasureSpec;
if(height == 0) {
  childHeightMeasureSpec = getChildMeasureSpec(parentHeightSpec, heightPadding, WRAP_CONTENT);
} else {
  childHeightMeasureSpec = getChildMeasureSpec(parentHeightSpec, heightPadding, height);
}
// ...
For measurement purposes, any size is equivalent to wrap_content and other
values (such as match_parent) would be passed through un-checked.
These measurements don't take into account any constraints, so a match_parent
view would generally just set its dimension to equal that of the parent container.
Keep that in mind for just a moment.
I said before that size-dependent (i.e. any size) views are measure again after constraints are applied. The second measure pass looks something like this:
ConstraintWidget widget = ...;
int widthSpec = MeasureSpec.makeMeasureSpec(widget.getWidth(), MeasureSpec.EXACTLY);
int heightSpec = MeasureSpec.makeMeasureSpec(widget.getHeight(), MeasureSpec.EXACTLY);
ViewGroup.LayoutParams lp = child.getLayoutParams();
if(lp.width == WRAP_CONTENT) {
  widthSpec = getChildMeasureSpec(widthMeasureSpec, widthPadding, lp.width);
}

if(lp.height == WRAP_CONTENT) {
  heightSpec = getChildMeasureSpec(heightMeasureSpec, heightPadding, lp.height);
}

child.measure(widthSpec, heightSpec);
The second time around, which happens after the constraints are applied, any size
views are re-measured to be exactly the width or height that the constraints system
computed. The same process does not happen for a view marked as match_parent.
This is important because many views rely on measurements to compute content placement.
Gravity on a Button or TextView, for example, aligns the text based on the
view's measured size, not its actual layout position.
So why doesn't match_parent work in ConstraintLayout? Because the view bounds
are computed against the applied constraints, but the view measurement does not
account for the same constraints. This leads to odd behaviors in view content
placement at runtime.
View Layout Bounds
As noted in the steps above, the view bounds (left, right, top, bottom) for each
ConstraintLayout child are derived from analyzing the overall system of constraints.
The top-level ConstraintWidgetContainer initiates its own "layout" pass where
the widgets are traversed and their constraints evaluated to determine the
view sizes and positions as a system of linear equations.
After the system solution is computed (more on this below), each ConstraintWidget
is updated with the proper bounds for its attached child view.
The process during onLayout() then turns out to be quite simple, as ConstraintLayout
needs only to iterate over its children and set their bounds values. Something akin
to the following:
for(int i = 0; i < getChildCount(); ++i) {
  View child = this.getChildAt(i);
  ConstraintLayout.LayoutParams params =
      (ConstraintLayout.LayoutParams)child.getLayoutParams();
  ConstraintWidget widget = params.widget;
  int l = widget.getDrawX();
  int t = widget.getDrawY();
  int r = l + widget.getWidth();
  int b = t + widget.getHeight();
  child.layout(l, t, r, b);
}
Analyzing the Constraints
ConstraintLayout distills the constraints applied by views down to a system of
linear equations that it can solve at runtime to determine the positions of each
anchor point. This, in turn, defines the bounds of the corresponding view.
During onMeasure(), each anchor point becomes a system variable, and each
constraint is converted into an equation to describe how the attached variables
relate to each other. Once the system of equations is built, ConstraintLayout
implements a solver using the
Cassowary algorithm
to compute the values of each variable.
Note: Cassowary is implemented in many other platforms and languages for various use cases. On Apple platforms, for example, the Auto Layout solver is driven by the same algorithm. Here is some fun reading on the use of Cassowary on other platforms and systems.
First, constraints are added for the sizing of the parent container. Next, each
ConstraintWidget is given a chance to add its own constraints until we end up
with one large "table" of equations for the solver to attack. As each constraint
is added, related equations are connected and simplified wherever possible. This
reduces the amount of work to minimize the system later on.
Linear Programming 101
Linear systems are typically comprised of a single linear function (meaning no exponents) that can have multiple solutions — often called the object function or goal. A system of additional equations, or constraints is provided to determine boundary conditions that reduce the number of possible solutions to the goal.
However, constraints alone often do not reduce the goal possibilities down to a single solution. Common practice is to minimize or maximize the goal, meaning that the solution we seek is one that provides the largest or smallest possible value for the goal function.
With
ConstraintLayout, the goal function is generally built from variables in constraints that compete, such as two constraints on the same axis (centering the view) or when ratio constraints are in play. In these cases, the layout adds "slack" variables that can absorb the excess space to the goal function and seeks to minimize the goal in order to resolve their values.
To illustrate what the equations look like in more detail, let's look at an example...
Simple Centering Constraints
Think of an XML layout where the Button is centered on both axes in the parent container:
<android.support.constraint.ConstraintLayout
  xmlns:android="http://schemas.android.com/apk/res/android"
  xmlns:app="http://schemas.android.com/apk/res-auto"
  xmlns:tools="http://schemas.android.com/tools"
  android:id="@+id/constraintLayout"
  android:layout_width="match_parent"
  android:layout_height="match_parent">

  <Button
    android:layout_width="wrap_content"
    android:layout_height="wrap_content"
    app:layout_constraintStart_toStartOf="@+id/constraintLayout"
    android:layout_marginStart="16dp"
    app:layout_constraintTop_toTopOf="@+id/constraintLayout"
    app:layout_constraintEnd_toEndOf="@+id/constraintLayout"
    android:layout_marginEnd="16dp"
    app:layout_constraintBottom_toBottomOf="@+id/constraintLayout" />
</android.support.constraint.ConstraintLayout>
This layout produces the following set of 16 constraint equations for the solver
to determine the bounds (L/R/T/B) of parent and child:
(h = height, w = width, m = margin)
LP = x
RP = LP + wP
TP = y
BP = TP + hP
These four equations are defined by the parent ConstraintWidgetContainer.
The parent constraints are fairly straightforward, and essentially just define
the boundaries that will be used for the others. X and Y are always zero (since
measurements are parent-relative).
R = L + w
L ≥ LP + mL
R ≤ RP + mR
L + R = LP + RP + mL - mR
These come from the horizontal centering constraints. The positioning constraints are inequalities, so finding the solution requires additional information. A third constraint equation is added that guarantees the spacing is even on each side (we'll call this the centering constraint) by verifying that the sum of the two child bounds is equal to the sum of the same parent bounds.
B = T + h
T ≥ TP + mT
B ≤ BP + mB
T + B = TP + BP + mT - mB
These come from the vertical centering constraints. Notice they are similar to the group above, but for the top and bottom bounds instead.
Summary
There is no doubt that ConstraintLayout is a complex piece of code, and we've
only uncovered a small portion of how it works and what it can do. However, despite
its complexity, I hope you now have a better understanding of what constraints are
and how they get evaluated.
I would encourage you to step through the code of a simple layout and identify
the linear equations it produces. See if you can solve them yourself and come up
with the same result as the tools! Then, perhaps ConstraintLayout will feel a
bit less like magic and more like a tool that you can wield with confidence.
The Future of Containers
I've said before I'm just an outsider and have no idea what Google's future plans are, but this architecture has me pretty excited about the potential future of Android layout.
ConstraintWidgetContainermanages a group of childConstraintWidgetinstances the same way that layouts manage child views. In this way,ConstraintWidgetContaineris a sort of "virtual ViewGroup". The code is organized such that these items can be nested, although they aren't currently. Right now, the top-levelConstraintLayoutmanages the onlyConstraintWidgetContainerinstance.Think about this in terms of the ultimate goal of flattening your layout hierarchy. What if you could nest layout behaviors without actually nesting the views themselves? What if we could create specialized containers implementing features that mirror
LinearLayoutorGridLayout, and apply those rules to a subset of the children insideConstraintLayout? Nesting behaviors without incurring the measurement/layout expense of nesting views themselves would be a very powerful concept indeed! All we would need would be an API hook into the widget used to group certain child views.I'm probably wrong. You should probably just ignore me. But what if I'm right?